laravel+workerman 简单版
第一步:首先composer workerman
项目路径下执行:composer require workerman/workerman
第二步:项目根目类下执行:php artisan make:command workerman
第三步:
然后>/app/Console/Commands下面就会创建一个文件workerman.php
我们改一改signature description 还有handle方法...↓
记得引入workerman

第四步:注册command
AppConsoleKernel.php文件添加刚才创建的command
第五步:修改workerman.php 文件
<?php
namespace AppConsoleCommands;
use IlluminateConsoleCommand;
use App;
use WorkermanWorker;
class WorkermanServer extends Command
{
/**
* The name and signature of the console command.
*
* @var string
*/
protected $signature = 'workerman:command {action}';
/**
* The console command description.
*
* @var string
*/
protected $description = 'Workerman Server';
public function __construct()
{
parent::__construct();
}
/**
* Execute the console command.
*
* @return mixed
*/
public function handle()
{
// 创建一个Worker监听2345端口,使用http协议通讯
$http_worker = new Worker("tcp://127.0.0.1:2000");
// 启动4个进程对外提供服务
$http_worker->count = 1;
//新进程建立链接时服务端展示ID
$http_worker->onConnect = function ($connection) {
echo 'user:[' . $connection->id . "] ";
};
// 接收到浏览器发送的数据时回复hello world给浏览器
$http_worker->onMessage = function ($connection, $data) {
foreach ($connection->worker->connections as $con) {
$str = "user:{$connection->id} spk:{$data}";
$con->send($str);
}
// 向浏览器发送hello world
//$connection->send('hello' . $data);
};
// 运行worker
Worker::runAll();
}
}
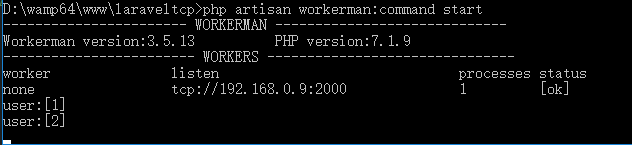
第六步:启动服务
php artisan workerman:command start